Report on your favorite animals then create eye-catching zoo programs with hand-made stencils and paint rollers.
1.
Use Crayola® Scissors to cut three large squares from different colored construction paper. Set one sheet aside. Divide the other 2 sheets into three rows of three equal squares by folding paper into three equal sections horizontally and vertically. Open sheets to reveal fold lines.
2.
Use Crayola Scissors to cut 2 squares of oaktag the same size as one of the squares on the folded paper. In the center of one square draw a simple outline of a zoo animal. In the center of the other draw the outline of a plant or leaf from the animal's natural environment.
3.
Use the scissors tip to poke a hole in the middle of each drawing. From the inside, cut out both shapes. Discard the inside piece. The outline (or negative shape) is the stencil.
4.
Cover the work area with recycled newspaper. Choose two colors of Crayola Tempera Paint. Roll each color out, with a foam roller, on a recycled foam produce tray.
5.
To start a checkerboard design, place one stencil in the corner square of one of the creased pages of construction paper. Roll the paint evenly over the stencil opening with the foam roller. Repeat, using the same stencil and paint color, on the other three corners and in the center of the page. Set aside stencil, paint, and paper.
6.
Now work with the second stencil, paint color, and unfolded paper grid. Use stencil to make four more print on the corner square only. Set aside to dry.
7.
Use Crayola Erasable Colored Pencils or a computer to write a report on the zoo animal and its environment. Use special language to make it sound as though the animals is being introduced at the new zoo!
8.
When the paint is dry, cut out the four printed pieces from the second stencil set. Use Crayola School Glue to secure them in the spaces left in the first stencil page, which is the cover. Place the cover on top, then the program, and finally the third square sheet of construction paper. Glue or staple the pieces together to make a complete program.
Explore the rich visual culture of ancient Egypt! Create a captivating multimedia portrait in historic Egyptian style.
A famous section of Beijing, the capital of China, is surrounded by a moat. Imagine being in The Forbidden City, where a
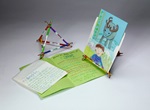
Explore Prince Edward Island with Anne of Green Gables! Draw and describe this enchanting Canadian island in an accordio
How do pets or wildlife care for their young? Discover how young animals change as they grow!
What pets do you feed, walk, or groom? Izak, who lives in Lapland, takes care of a reindeer! Match animals with owners a
Does animal brain size match body size? Affect intelligence? Sculpt the brains of three vertebrates to compare and contr
Students go wild filling Beasty Books and their brains with fun facts and figures about their favorite creatures.
Looking for a pizzazzy book report format? Try bas-relief sculpture to add a new dimension to your next presentation!