Fascinated with medieval knights? Put on imaginary armor to recreate epic art depicting the English Middle Ages. A gilded frame makes this project worthy of display in a museum.
1.
Much has been romanticized about the gruesome battles of European medieval times. Photography had not been invented yet, so our view of warfare and battles are based on its idealized portrayal in paintings. When England was being built into a feudal state, any man, landowner, or mercenary who fought on horseback was called a knight. After his warhorse, a knight’s armor was his most prized possession.
2.
Armor included a coat of mail, made with linked iron rings (sometimes as many as 40,000 hand-riveted links), and tailored to fit like a suit. The mail was flexible and allowed a knight to move easily. It weighed about 15 kg (33 lb). A padded garment of leather or cloth was often worn underneath the mail for comfort and additional protection.
3.
Later, coverings of solid steel plates were added. Sometimes this armor had as many as 200 sliding segments so the knight had a full range of movement. All in all, a suit of armor weighed less than a soldier’s backpack weighs today. Find out more about the ways armor was worn.
4.
Also, explore how weapons were used to pierce or crush the armor. What methods did horsemen use to fight? How did they use their swords and lances? When cannons and then later handguns were invented, knights and their style of fighting were no longer used on the battlefield. Are you ready to create your own medieval scene? Here’s one way to show your knowledge about knights in armor.
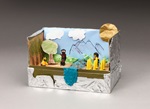
5.
Cover your art area with recycled newspaper. Choose a recycled wooden picture frame. To decorate the frame, attach string to it with Crayola School Glue. Air-dry the frame.
6.
Sketch your medieval scene (smaller than the frame) with Crayola Erasable Colored Pencils. Cut cardboard in the outline shape of the scene with Crayola Scissors.
7.
Layer Crayola Model Magic on the cardboard to give your scene depth and dimension. Use colored pencil points to incise details such as banners and steel plates into the modeling material. Shape two pieces of Model Magic as feet for the frame so it can sta
8.
Paint the frame and its supports with gold or silver Crayola Premier™ Tempera and Paint Brushes. Air-dry completely.
9.
Paint your dried Model Magic scene with Crayola Artista II Tempera. Air-dry.
10.
Glue feet to the frame. Air-dry the feet.
11.
To suspend your medieval scene inside the frame, glue heavy string or a thin dowel stick to the cardboard back. Stretch and glue string to the back of the frame. Paint the string or stick to match the frame if you wish. Air-dry flat before displaying.
Explore Prince Edward Island with Anne of Green Gables! Draw and describe this enchanting Canadian island in an accordio
Looking for a pizzazzy book report format? Try bas-relief sculpture to add a new dimension to your next presentation!
Corn (maize) was a staple in the Aztec culture. Show the Aztec’s sophisticated corn-growing techniques in a realistic di
Dig deep into an ancient Mexican culture! Recreate colors reminiscent of traditional turquoise and coral found on these
Connect with an ancient culture with these Model Magic Presto Dot masks! Discover what role masks played in Aboriginal l
Letter-writing takes a new turn with this stationary that wraps right up into its own envelope.
Imagine a community in Cameroon, along the west cost of Africa. The weather is hot and dry. Traditional homes are made o
On Remembrance Day, Canadians honor fallen heroes and heroines. Create a 3-panel display to show why and how this event