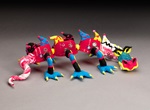
Celebrate Chinese New Year, or your favorite story, with this dramatic dragon!
1.
Wash and dry several recycled plastic containers. To create a dragon body, you will attach them together. Ask an adult to punch a hole in the ends of each cup and another hole on each side. Use Crayola® Scissors to poke the holes.
2.
<em>Connect the body sections. </em>Form a small piece of Crayola Model Magic into a cube. Push a chenille stem through it. Connect dragon sections together by passing the stems through the end holes. Fold the chenille stems inside. Connect all of your sections.
3.
<em>Shape legs.</em> Create long dragon legs by forming Crayola Model Magic around chenille stems, leaving a finger-length empty.
4.
Shape dragon feet, too. Press them onto the bottom of each leg. If the Model Magic is slightly dry when you attach the feet, use a drop of Crayola School Glue to hold the feet on the legs.
5.
Push the empty chenille stems into the holes on the sides of the body. Twist the stems together inside the body so they are tightly connected. Prop up the dragon so its body is off the table enough to be supported by the legs. Air-dry your dragon overnight.
6.
<em>Heads up! </em>Create a head for your dragon from a recycled paper-towel tube. Cut teeth and eyes into the tube. Color it with Crayola Gel Markers.
7.
Form a neck with Model Magic. Glue the head to the top of the neck. Glue the neck to the front of the dragon’s body. Add details such as flames, spines, spots, or stripes. Prop up the head and neck and air-dry it overnight.
8.
<em>Twitch the tail!</em> Form a long tail from Model Magic. Glue it to the back of the body. Add details. Air-dry overnight.
9.
When your dragon is completely dry, add decorations with markers and Crayola Glitter Glue. Air-dry the dragon before displaying it.
Indulge your kids' delight at being a little scared. Kids who have fears might sculpt their worst nightmare-and feel les
Harry Potter fans know that Quidditch is the premier sport of the wizarding world. Create an action scene from your favo
Catapult kids to the time of knights and chivalry as they create an imaginary castle! Start the royal treatment by readi
Stand back! W-a-y back! Real porcupine quills can prick! Will your critter be friendly or fierce?
Track down some wild or cuddly animals! Take a "paws" to have fun.
Tame the wild--create a fiery dragon with Model Magic® compound! Cover recycled materials to transform them into the lor
Watch butterflies flutter outdoors, then make your own with coffee filters.