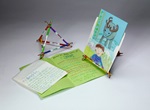
1.
Encourage children to study seed packets for ideas about designs and growing information. Make sure seed packets are empty if children still put nonfood items in their mouths. Tour gardens or flower beds with signs.
2.
Cut the construction paper for children 3 and younger to ensure safety.
3.
As children work, encourage them to talk about their creation and the information on their garden sign. Provide samples of words.
4.
Cut a piece of 8 1/2- by 11-inch construction paper in half lengthwise with Crayola® Scissors (4 years and older). An adult cuts if you are younger. Fold it in the middle to make a seed packet. Place the open side down.
5.
How you think your plant will look when it is grown. Will it have flowers? Fruit? Leaves to eat? Look at pictures and flowers or food for ideas.
6.
Fill one side of your sign with a picture of the plant or its produce. Use Crayola® Construction Paper™ Crayons.
7.
On the other side of your sign, write your name. List care instructions such as "Water twice a week."
8.
Open your sign, and lightly cover the inside with Crayola® School Glue. Place a craft stick at the bottom with most of it sticking out. Fold the sign and press to seal. Dry overnight.
Explore the rich visual culture of ancient Egypt! Create a captivating multimedia portrait in historic Egyptian style.
A famous section of Beijing, the capital of China, is surrounded by a moat. Imagine being in The Forbidden City, where a
Explore Prince Edward Island with Anne of Green Gables! Draw and describe this enchanting Canadian island in an accordio
How do pets or wildlife care for their young? Discover how young animals change as they grow!
What pets do you feed, walk, or groom? Izak, who lives in Lapland, takes care of a reindeer! Match animals with owners a
Does animal brain size match body size? Affect intelligence? Sculpt the brains of three vertebrates to compare and contr